Vehicle construction
Guide created using an unknown version of Cataclysm DDA.
The information present here might not apply to the current version of CDDA, it was created for 0.D (Danny) and earlier
| Vehicles |
|---|
| Driving |
| Repairs |
| Installing and removing parts |
| Construction |
| Parts and components |
Building and modifying vehicles is its own sub-game within C:DDA with its own rules and quirks. This guide will get you started with building your own vehicles and understanding how the parts interact and, most importantly, knowing and understanding their location in the vehicle system.
Getting Started
To begin you will need a vehicle part that has the "INITIAL_PART" flag. This isn't listed in-game, but you can find these details on this wiki and in the JSON files. As of this writing on 3/4/16 here is a list of items with this flag:
- Steel frame
- Foldable-light frame
- Foldable wooden frame
- Extra light frame
- Heavy duty frame
- Wooden frame
- Light wooden frame
First construction
Access the construction menu * and select 'Start Vehicle Construction.'
You'll be prompted to Construct where? (Direction button) to choose one of the cardinal or ordinal directions where your vehicle's first part will be built.
Next you'll be prompted to Enter new vehicle name:____ for the vehicle. If you leave it blank or esc it'll default to 'Car' (you can change it later).
 first frame of the first tile of a constructed vehicle

examine
Once your vehicle is constructed you will mainly interact with its parts by examining the vehicle to open the vehicle menu. The construction menu is only used in the first step to place the first initial part.
From the vehicle menu you can install parts, repair parts, refill fuel sources, remove parts, siphon fluids, change tyres, rename the vehicle, and label sections.

Tools
The tools needed (in your inventory or nearby) vary according to each part. When you first attempt to install a part you'll be given a list at the top of the vehicle menu that shows any missing tools in red. It is possible to have the tool, but not have the power needed to run the tool -- the tool will remain green in this case. Check your batteries or power if there doesn't appear to be any missing tools, but you're not able to install a part.
Across the top of the install menu there is a list <All> C L U H I O of categories to help organize the parts as it can grow very large. Use TAB to move right through the menu and SHIFT+TAB to move left. Use the arrow keys ↑↓ to move your selection up and down the list and →← to page up or page down the list.
 list of items available, item, and tools needed after choosing to install

If you want to be ready to install or remove any part collect these tools:
- welder with welding goggles
- duct tape
- wrench or equivalent tool with 1 level in bolt turning and fine bolt turning quality
- screwdriver or equivalent tool with 1 level in screw driving quality
- hacksaw or circular saw or acetylene torch
- integrated toolset
A few of these tools can be used in place of another. For example, if you have duct tape, you do not need the welder and googles as on the image of the install menu above.
Locations
As you've seen there are categories in the vehicle menu, but the layers of inclusive, exclusive, and part dependencies are deeper than those six categories. Vehicle parts gain their properties from their location data (or absence thereof) and their item flags. Like the INITIAL_PART flag these aren't visible in the game, but you're in the right place to learn more about what parts you can install where.
Part locations
There are 8 locations where parts are installed.
- Roof
- Center
- Fuel source
- Engine block
- Structure
- Under
- Armor
- Anywhere/Other
These locations do not depend on being built up from the ground. So, for example, you could build a structure with a steel frame and put a solar panel on top of that tile without building a roof to put the solar panel onto -- solar panels simply occupy the on roof space to prevent more than one being built on the same tile and excluding other on roof parts like mounted guns from sharing that tile.
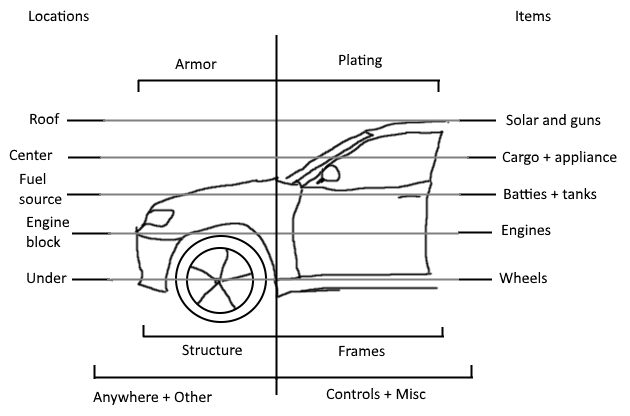 artist's rendition of the vehicle part locations

There are 6 sub-categories of locations that are installed on their locations. These parts do not always require that their parent category is created, but sometimes they do. To be able to install a seatbelt in the on seat sub-location, for example, you do have to have a seat installed into the center location first.
- On roof
- On ceiling
- On windshield
- On controls
- On seat
- On cargo
These sub-categories are self-explanatory for the most part, and besides on roof, are only used sparingly.
Part flags
Other parts have flags that force the items to only be placed on engines and doors respectively. These flags dictate how some parts are able to be installed in edge cases.
- ALTERNATOR -- installed over combustion and muscle engines to generate electric power
- DOOR_MOTOR -- installed in doors (used solely on the door motor)
- CURTAIN -- installed over a part flagged as WINDOW
- PROTRUSION -- keeps things like blades from allowing further installation
- BATTERY_MOUNT -- used by the Swappable storage battery and case's NEEDS_BATTERY_MOUNT flag
- INTERNAL -- used with the on cargo sub-location by the UPS-compatible recharging station
- NOINSTALL -- used by the jumper cables so that they are only installed through their action menu and not the vehicle menu (they are removed there)
You are able to view more details on the flags on the vehicle parts page and on each item's page on the wiki.
Survivor's first vehicle
So you've got the basics. Here we put them to use in building your first simple vehicle with easily-obtained materials. Generally, this means wood and nails to begin with. Strictly speaking you're better off finding a working vehicle for your first vehicle, but this section will teach you how to build your own vehicle from scratch when you're ready to gather all the components.
Shopping list
To complete the basics you'll want to collect these tools, items, and skill levels:
- fabrication level 1
- mechanics level 3
- wooden frame x 10
- wheel x 4 (with at least 2 that have steerable versions)
- vehicle controls x 1
- nail x 10 each time you install a wooden part ~ 100
- metal tank x 1 (or its 2L or little versions)
- V-twin engine x 1 (or any other combustion engine)
- car alternator x 1 (or other alternator)
- car battery x 1 (or other battery)
- gasoline x enough to run your vehicle!
- battery x enough to get (or already have) a beginning charge in your battery
The frame
First, build out the frame of your vehicle as its detailed below. You'll notice that after your first frame you simply move to an open blank area in cardinal direction next to an existing frame and you can build another. You'll have the option to build the new frame according to a list of glyphs -- these are purely cosmetic. I suggest you build them with a mind to show the front of your vehicle as that will help as you are driving.
 installing a new wooden frame vehicle part

We're building a small ATV-like vehicle to begin with. These are all wooden frame parts so far built out with the different shapes.
 no, it isn't a station wagon

The under
We'll need something to roll on. Steerable wheels and 'normal' wheels are installed from the same item. The steerable wheels determine where and how the vehicle rotates as you drive and turn. In this case I've installed 2 steerable wheels on the front and 2 normal wheels in the back.
 you'll need to scavenge some wheels

Creating comfort
If you're going to drive (and ride) in the vehicle you'll need a place to sit and control. There are several flavors of seats available, but you'll need at least one control.
An important lesson to note here is that the wooden seat is built with a wooden frame -- many items dealing with vehicle parts are transformed from the in-world tools and items you're used to into their vehicle part counterparts in the vehicle menu.
Even though we're using wooden frames to make the resources easier to gather you'll still need a welder and welding goggles to install the controls.

Horsepower
We're using a combustion engine in this example, but the other fuel and engine types don't require too much beyond what we've done here. Make note that by having a metal tank you're able to install all types of tanks, but choose a gasoline tank for our gasoline engine in this case.
 note that the type of tank you install determines what fuel it can hold

Scavenge gasoline from gas stations and from other vehicles with a container to store your collected fuel and a rubber hose to siphon fuel from the other vehicles.
Electrical system
Combustion engines need a spark to run and that power is provided by an alternator and stored in a battery. As you can see we're beginning to pile up parts in this one vehicle tile. As all the parts either have different locations or no location this works. The parts do not need to be all on one tile like this -- in this case I imagine an engine under the seat like an ATV -- but, what this will allow as an in-game benefit is use of the other squares for cargo or other useful vehicle parts that would have been taken up otherwise.
 makes me think of my first go-cart

End of the tutorial
At this point you have a working drive-able vehicle and this covers the basic systems needed. There are further quirks with things like the minireactor and building your own rolling deathmobiles that stroll across the New England wasteland as if it were a Sunday drive.
Don't stop at vehicles, though. You have the resources to create an outdoor solar fridge, independent base defenses, or even a hand-powered generator to light your basement stronghold.
See the other vehicle guides and the full list of vehicle parts to learn more!
| |||||||||||||||||||||||